utterances란?
github repository의 이슈 기능을 활용해 내 웹사이트에 댓글 기능을 추가할 수 있는 도구로, 별도의 백엔드 구성을 하지 않고 댓글들을 관리할 수 있다는 장점이 있다.
많이 비교되는 disqus라는 툴도 있지만, disqus가 댓글 작성을 누구나 할 수 있다는 장점이 있지만, 광고가 많다는 단점이 있다. 그에 반해 utterances는 github 계정 소유자만 댓글을 작성할 수 있지만, 별도의 광고도 없고 댓글 작성 시 Markdown을 지원한다는 특징이 있다.
나는 utterances를 github blog에 사용할 생각이기에 굳이 utterances의 장점을 버리고 disqus를 사용할 이유가 없었다.
사용방법
1. repo 생성
public으로 설정된 새 레포가 필요하다.
github blog에 연동해도 상관은 없겠지만 댓글만을 위한 저장소를 만들어 놓는게 관리가 훨씬 쉬울 것 같아 새 repo를 생성해줬다.

저장소 이름은 아무래도 좋다.
2. utterances 설치
githb app에서 다운받을 수 있다.
https://github.com/apps/utterances
GitHub: Let’s build from here
GitHub is where over 100 million developers shape the future of software, together. Contribute to the open source community, manage your Git repositories, review code like a pro, track bugs and fea...
github.com
3. utterances access 설정
app이 설치되면 Configure를 통해 어떤 저장소에 연동해줄지 설정할 수 있다.
선택한 저장소에만 연동되게 설정해 주었다.
4. utterances.json 생성
{
  "origins": ["https://{my url}"]
}
위와 같이 자신이 댓글 기능을 사용할 사이트를 utterances.json에 입력해준다.
5. script를 블로그 ropo code에 복사
https://utteranc.es/?installation_id=35005881&setup_action=install
utterances
utteranc.es
해당 사이트에 들어가면 어떤 방식으로 script를 구성할지 설정할 수 있다.
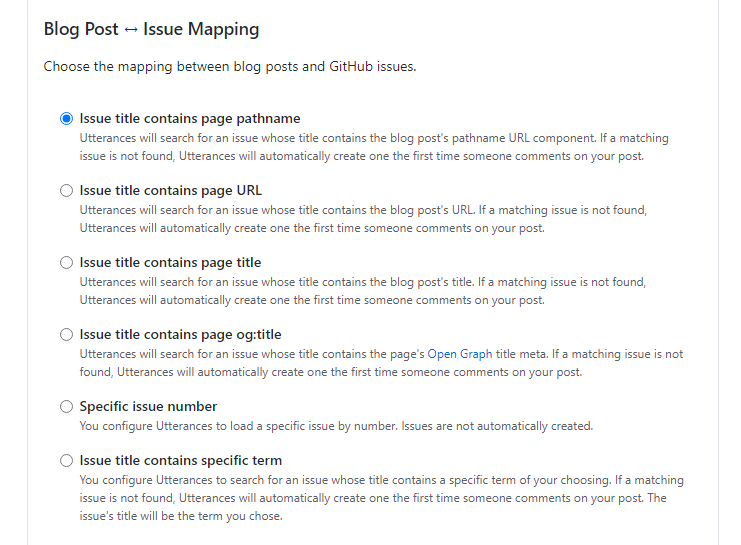
Issue mapping같은 경우, 댓글과 포스팅을 어떻게 맵핑할지 설정하는 것인데, 통상적으로 pathname이나 URL을 많이 사용하지만 본인 프로젝트의 상황에 맞춰 설정해주는 것이 가장 좋다.
또한 한글 파일명을 사용해 url이나 pathname을 생성하는 경우, 유니코드 인식 문제로 정상적인 url로 노출되지 않기 때문에 설정에 유의해야 한다.
// 복사할 스크립트
<script src="https://utteranc.es/client.js"
        repo="name/repositoey" // repo 이름
        issue-term="pathname" // issue mapping
        theme="github-light" // 테마 색상
        crossorigin="anonymous"
        async>
</script>
테마 색상도 여러가지가 있으니 utterances 사이트에서 원하는 색상을 골라서 사용하면 된다.

위에 생성한 script는 통상적으로 댓글 부분에 해당되는 곳에 그대로 복사해 넣지만,
나는 Nextjs를 통해 댓글 컴포넌트를 생성할 것이기 때문에 다른 방식을 사용했다.
export const Comment = () => {
  return (
    <section
      ref={elem => {
        if (!elem) {
          return;
        }
        const scriptElem = document.createElement("script");
        scriptElem.src = "https://utteranc.es/client.js";
        scriptElem.async = true;
        scriptElem.setAttribute("repo", "{utterances repo name}");
        scriptElem.setAttribute("issue-term", "pathname");
        scriptElem.setAttribute("theme", "github-dark");
        scriptElem.setAttribute("label", "blog-comment");
        scriptElem.crossOrigin = "anonymous";
        elem.appendChild(scriptElem);
      }}
    />
  );
};
해당 컴포넌트에서 사용하기 위해 기존의 script와 같은 속성들을 넣어줬다.

하지만 strict 모드를 false로 해도 종종 댓글창이 2개가 되어버려 useEffact를 통해 1번만 script를 붙일 수 있도록 코드를 수정했다.
import { useEffect } from "react";

export const Comment = () => {
  const makeRef = (el: HTMLElement | null) => {
    if (!el) {
      return;
    } else {
      const scriptElem = document.createElement("script");
      scriptElem.src = "https://utteranc.es/client.js";
      scriptElem.async = true;
      scriptElem.setAttribute("repo", "{utterances repo name}");
      scriptElem.setAttribute("issue-term", "pathname");
      scriptElem.setAttribute("theme", "github-dark");
      scriptElem.setAttribute("label", "blog-comment");
      scriptElem.crossOrigin = "anonymous";
      el.appendChild(scriptElem);
    }
  };

  useEffect(() => {
    const newEl = document.getElementById("comment-box");
    makeRef(newEl);
  }, []);

  return <section id="comment-box" />;
};
코드를 수정하니 원하는대로 작동한다.
'개발일지 > github' 카테고리의 다른 글
| [Github] 깃허브 토큰을 이용한 GithubAPI 사용 (0) | 2023.03.31 |
|---|---|
| GithubAPI를 이용한 repository 정보 불러오기 (0) | 2023.03.15 |
| Github pages 블로그에 Markdown 내용 불러오기 (0) | 2023.03.15 |
| 깃허브 블로그 만들기 (0) | 2023.03.15 |


댓글